Importing Participants, Households, and Organizations
Import Tool: Create or Update Many Participants, Organizations, or Households at Once
Contents
- Overview
- Access the Import Tool
- Create New Records
- Update Records by System Record ID
- Update Records by Participant ID
Import Tool Overview
The Import Tool allows you to create brand new records or update existing records. Currently, you can do one or the other but not both in the same file. You will need to download a template file for the type of import, fill it out, and upload it. Compyle will analyze the file and alert you to certain kinds of unexpected values. Once the import is complete, the import file will be saved for future review.
There are three sections within the Import Tool, and they are based on the different phases of the import process: preparing data for import, importing the data, and reviewing what has been imported.
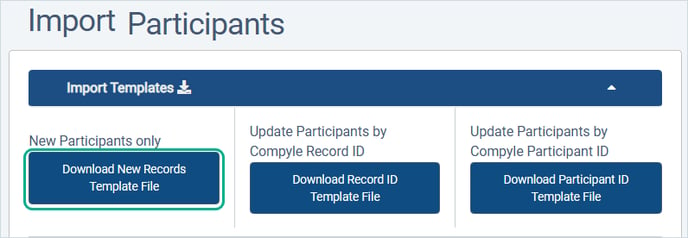
- Import Templates: Download a template CSV* file to enter data into.
- Import Records: Upload a filled in template CSV file.
- Import History: Review the import history for your site.
*A Comma Separated Values (CSV) file is a generic, single tab spreadsheet file that can be edited in Excel, Google Sheets, Open Office, or even Notepad.

Accessing the Import Tool
The import tool for each entity form is found in the left sidebar menu section for that particular entity, or profile type. The Participant Import is in the Participants section. The Household Import. Similarly, the Organization Import is located in the Organizations menu section.

Importing Participant-Household links is handled by the Household Link Import tool, which is also under Households in the nav menu. That relationship import tool is covered in a separate article.
Create New Participants, Households, or Organizations
If you have a list of participants in a spreadsheet or even on paper, the list can be used to create new records for those participants in Compyle. The information will need to be entered into the "New Records" template file.
- Step 1. Gather your existing Participant data
- Step 2. Open the Import Tool in Compyle (Participants > Import in the left sidebar menu)
- Step 3. Download the New Participants only template file.
- The CSV template has columns for all standard fields such as name, birthdate, email, gender, etc, as well as any custom participant fields set up by the administrator.
- All of the fields on the form must be included in the import file as columns, and they have to be in the same order as in the template file.

- Step 4. Add your information to the New Participants template file.
Formatting Tips for Preparing the Import File
-
- The import file must match the template file's column count and column order.
- Options for multi-select fields must be separated with a comma without spaces, like "option1,option2".
- Participants must have unique email addresses. Duplicate email addresses will not be imported.
- For participants, the minimum required information for each participant is first name, last name, and email.
- For organizations, the only required field is organization name.
- Updating Records:
- Participant ID is either the system-assigned alphanumeric ID, like XRCOG5X4, or a manually entered value. This is controlled by the Admin > Instance Setting for IDs.
- The Compyle Record ID is a unique numeric value assigned by the system behind the scenes. This system field is available in exports.
- The following duplicate check fields are required:[] Changing the duplicate check fields for this form will change the fields required for new record imports.
- Step 5. Import the File to Add the Participants to Compyle
- (1). Optional: Select a group to add the participant records to
- (2). Select Create New Records Only for the import type
- (3). Upload the import file

-
- (4) Review any warning messages that display.
- (5) Optional: Undo import to cancel adding the records so you can make updates to the template file.
Updating Records by Record ID
- Step 1: Download the template file

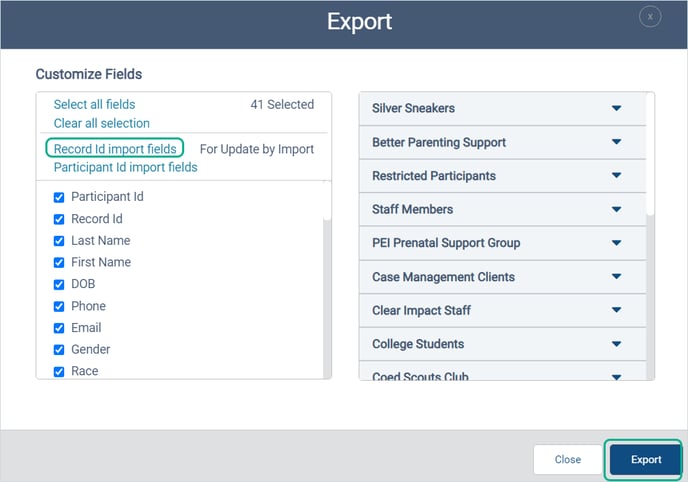
- Step 2: Export the participant records to update
- (1) Choose the Export for Record ID Import option
- (2) Click the Export button

-
- (3) Find the prepared export in Data Collection > My Downloads
- (4) Download the file.
- Step 3: Copy the exported data into the import template file.
- Step 4: Make any data updates in the filled out import template file.
- Step 5: Review the file.
- Make sure that every field that had data in the export has data in the import file or has been intentionally cleared.
- Any columns left blank will overwrite the existing entries for that field as blank.
- Step 6: Import the file
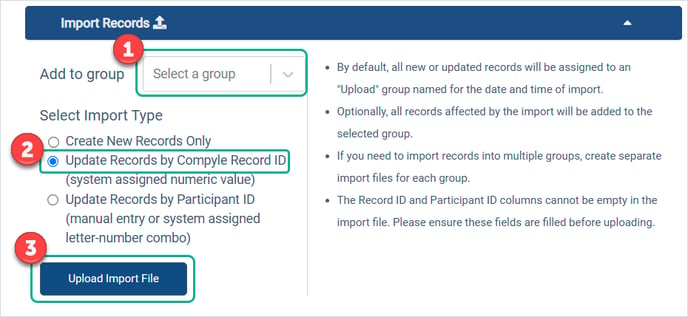
- (1). Optional: Select a group to add the participant records to
- (2). Select Update Records by Compyle Record ID for the import type
- (3). Upload the import file

-
- (4) Review any warning messages that display.
- (5) Optional: Undo import to cancel adding the records so you can make updates to the template file.
Update Records by Participant ID
- Step 1: Download the template file

- Step 2: Export the participant records to update
- (1) Choose the Export for Participant ID Import option
- (2) Click the Export button

-
- (3) Find the prepared export in Data Collection > My Downloads
- (4) Download the file.
- Step 3: Copy the exported data into the import template file.
- Step 4: Make any data updates in the filled out import template file.
- Step 5: Review the file.
- Make sure that every field that had data in the export has data in the import file or has been intentionally cleared.
- Any columns left blank will overwrite the existing entries for that field as blank.
- Step 6: Import the file
- (1). Optional: Select a group to add the participant records to
- (2). Select Update Records by Participant ID for the import type
- (3). Upload the import file

-
- (4) Review any warning messages that display.
- (5) Optional: Undo import to cancel adding the records so you can make updates to the template file.
See Also: Data Migration Process