Creating and editing Public Forms is an administrator privilege, but creator users can add Public Forms to surveys and notes once administrators have created the Public Forms.
Public Forms Overview
A Public Form is a custom version of an Entity Type form, such as the Participant form, Household form, Organization form, or Anonymous form. Each Public Form can be unique. Administrators choose which fields to display and require. Each public form has its own title, set of fields, and default group to assign participants/households/organizations to.
There can be many different public forms in the same Compyle instance for gathering information in different contexts. For instance, an agency may want to ask volunteers about their availability and areas of interest on a Volunteer Application, but the agency would not want to ask new clients for that information on a Client Intake when a new person is responding to survey.
A public form is filled out by participants, households, or organizations not already active in your Compyle site who use a link to a Public form or to a survey form or note type form. This link may be on a website, social media post, from a QR code, or in an email that wasn’t generated and sent by Compyle.
Note: If a survey form instance URL is accessed by participants / organizations who do exist in the system, then as long as they sign in with the same email listed in their profile, they will not have to fill out the public form. And their survey responses will be linked to the correct participant / organization record.
How Public Forms and Survey Forms Work Together
Each survey form and note form may only be associated with one public form for each type of responder who may complete the form. Typically, survey forms and note forms are available to participants. Forms can be set to accept organization or anonymous responses, too.
Each type of responder and the public form for that responder can be found in the Response Settings section on the Settings tab of the Form Management Folder.

Default Public Forms
Compyle provides default public forms for participants, organizations, and anonymous responses. This is because new responders will need to complete basic information so that Compyle can create a profile to connect their survey or note record to. The default forms themselves cannot be edited, but custom Public Forms can be created to replace them.
-
Participant Default Public Form
The participant default form includes first name, last name, email, profile photo, and gender. The name and email fields are required.
-
Organization Default Public Form
The default organization public form includes the organization name and email domain.
-
Anonymous Default Public Form
The default anonymous response public form includes an optional state field.
4. Household Default Public Form
The default household public form has limited required data.

How to Find the Public Form Setting for Surveys and Notes
To find out which Public Form is being used by a survey or note form:
- Open the Form Management Folder
- Data Collections > All
- Choose the Collection with Survey/Note
- Click the name of Survey/Note form
- Select the Settings tab at the top.
- See the Public Form column in the Response Settings section.

Creating a New Public Form
If the default public form does not include the fields you would like to collect from those completing a survey or note form, you can create a new Public Form to capture the information and then designate the new form as the one to use with your survey or note.
To access the Create New Public Form Wizard:
- Expand the left sidebar menu.
- Expand the Admin menu category
- Select Public Forms

- Click the Add Form button to start the Create New Public Form Wizard.

- In Step 1 of the Create Public Form Wizard, you name the form, decide who will use it, and whether they will be added to a specific group by default.
- Form Title: Enter a name for the form. This will be visible to those completing the form as well as to Compyle users. A descriptive name will help you identify the form later.
- Respondent Type: Choose whether the form will be for Participants, Organizations, or Anonymous. If your Compyle site only has Participants, that is common. Just choose Participants.
- Add to Group: Optionally, select a default group for new Participants who complete this Public Form.
- Description: Optionally, enter information about who will be completing this form and when

- Click the Next button to continue to Step 2.
- In Step 2 of the Create Public Form Wizard, you can choose what will happen if someone completes this form by itself.
- Confirmation Message: Take the user to a page that shows the text entered in the Message field.
- Redirect to URL: Take the user to a specific website after they enter a new Public Form record. Selecting this option will make a URL field appear for entering the website address.

- Click the Next button to move on to Step 3.
- In Step 3 of the Create New Public Form Wizard, choose which fields will be shown in the Public Form and which of those will be required.
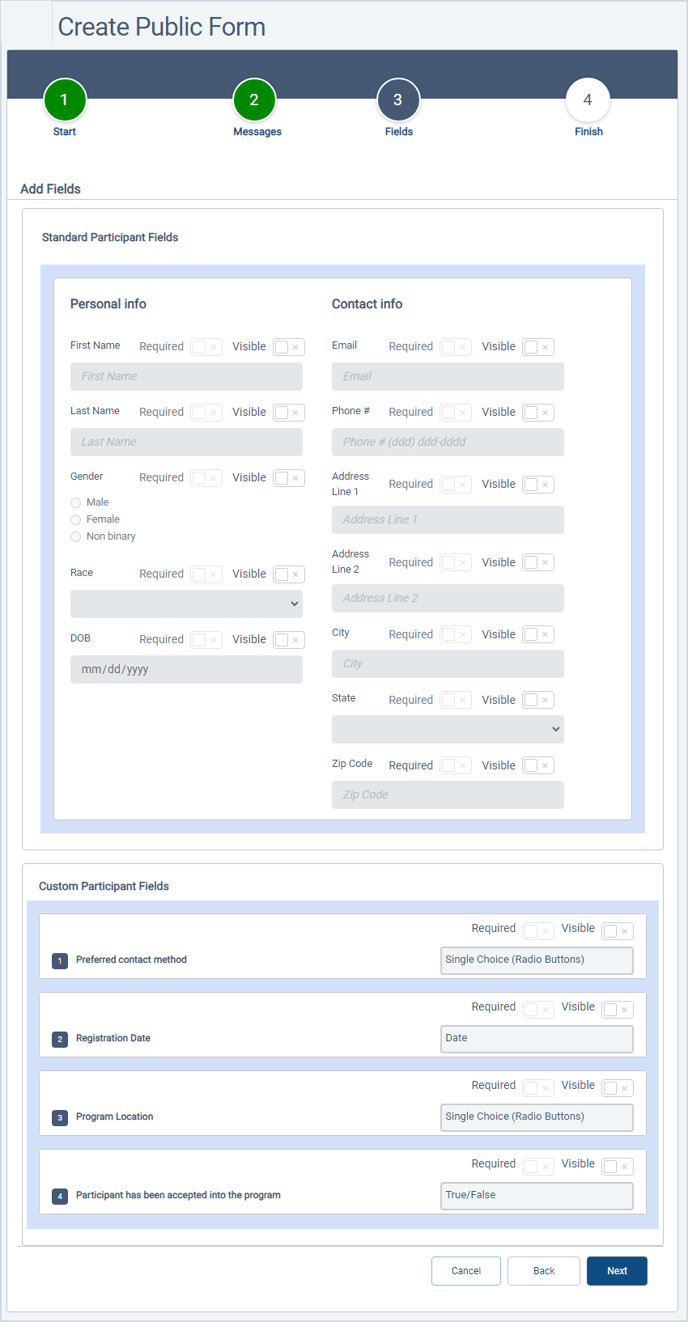
-
-
Standard Fields section
These are the built-in fields that came with Compyle. Choose at least one field to be visible.- If there is information you need to be able to contact people after they complete the form, make sure those fields are visible and required.
- By default, no fields are visible, but there must be at least one standard field visible on the Public Form for it to work properly.
-
Custom Fields section
These are fields that have been added to the Participant form (Admin > Participant Fields) to gather additional information.- If there is new information that you need to collect that is not included in the custom fields section, new fields can be added to the custom fields section of the Participant Fields, Organization Fields, or Anonymous Fields and then made visible here.
-
Field Options for Public Forms
- Visible: The field will appear on the public form. It is still optional.
- Required: The field must be completed to submit the public form. A field has to be visible before it can be set to required.
- No Selection: The field will not display on the public form.
-
- After selecting the visible and required fields, click the Next button to Save the public form.
- Step 4 of the Create New Public Form Wizard confirms that the new public form has been created.

Setting a Survey to Use a Custom Public Form
To view or edit the Public Form setting for a survey form:
- Open the Form Management Folder
- Data Collections > All

-
- Choose the Collection that contains the Survey form tha
- Click the name of Survey form to open the Form Management Folder
- Select the Settings tab at the top.

- See the Public Form column in the Response Settings section.
- Edit the Response Settings section.

- Select the Public Form.
- Save the change.
- Review the Response Settings to see the new setting.

Setting a Note Type Form to Use a Custom Public Form
The process for changing the public form for note type forms is very similar to the process for survey forms, but the Note Form Management Folder is found under Admin > Note Types.
- Admin > Note Types

- Click on the name of the note to open the Note Form Management Folder.

- Open the Settings tab.

- Edit the Response Settings section.
- Select the Public Form.

- Save the change.
- Review the Response Settings to see the new setting.

Viewing Newly Completed Public Forms
The new records will appear in the Participants > Pending list or the Organizations > Pending list, unless the Auto Accept New records option is active in Admin: Instance Setting. The name of the public form will appear to help identify where the new record is coming from.
