For users with instance administrator permission.
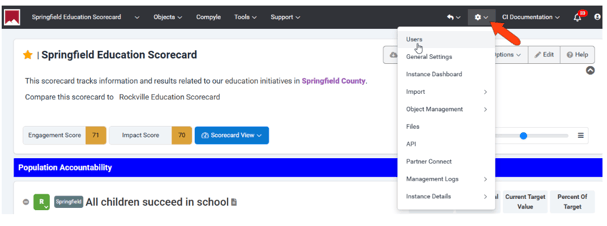
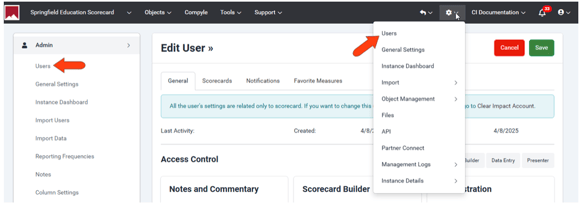
To view the list of your organization’s Scorecard users, click the Administration icon and choose Users.
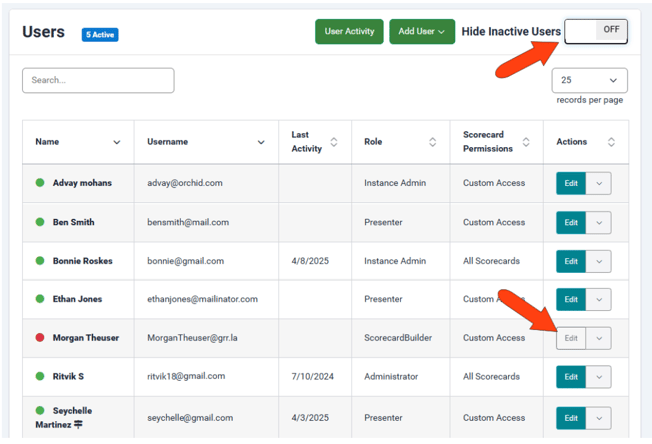
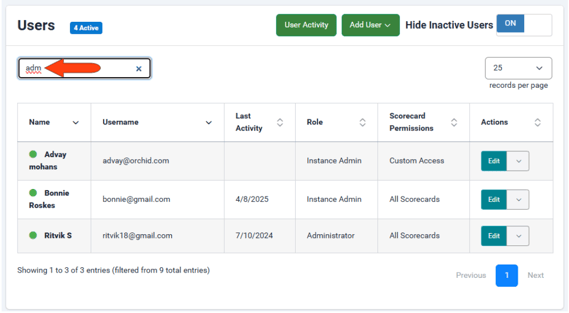
The Users list displays each user’s username, last activity, role, and Scorecard permissions.
The table can be sorted by clicking any column header, and the search field can be used to locate a specific user, by entering any characters from any of the fields.
Note: There is also an option on this page to view User Activity.
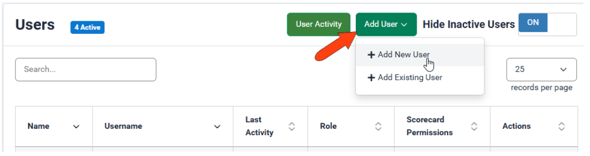
To add a user, click Add User at the top and select Add New User. (The Add Existing User option can be used to add a user from another instance.)
Note: The number of users you can have is set by your license type. You can view your user count on the Billing page and Instance Dashboard.
Also, if you already have a list of users in CSV format, you can import them all at once.
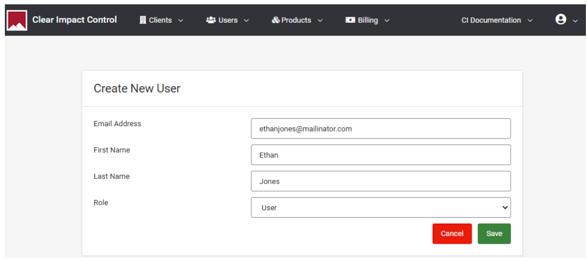
Adding a new user is done in Clear Impact Control. Enter the user’s email, name, choose either the User or Administrator role, and save. Specific permissions can be configured after returning to Scorecard.
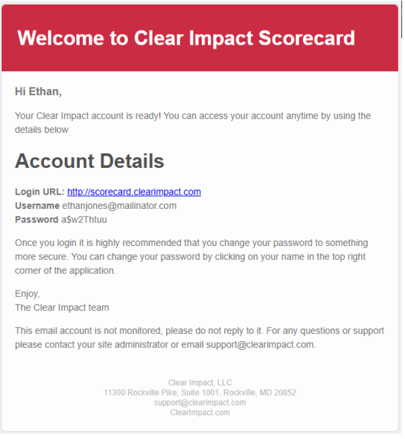
The added user receives a welcome email with account URL, username, and temporary password which they can change after their first login.
Once signed in, a user can update their own password, by clicking their avatar at the top right and choosing Clear Impact Account.
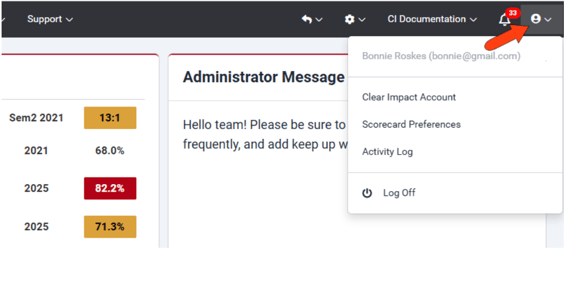
This opens their Manage User interface, where they can change name, upload an image, or reset their password.
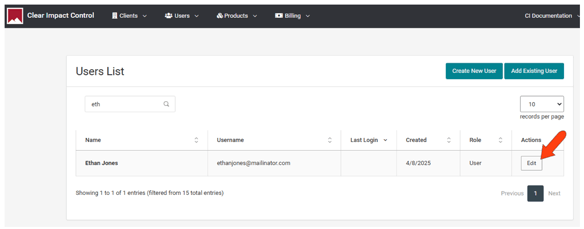
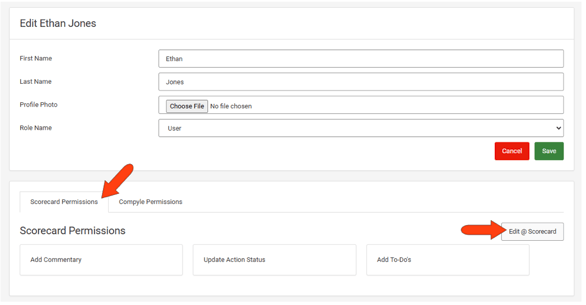
Returning the admin account, the new user is added to the Clear Impact Control Users List. Click Edit to start defining user permissions.
In the editing window, you can change name or role, and add a profile image. Default permissions are listed in the Scorecard Permissions tab, and can be refined by clicking Edit @ Scorecard.
This brings you back to Scorecard, to the Edit User page which has four tabs. After making any changes in any tab, be sure to click Save at the top.
The General tab is where you can configure roles and permissions. Start by selecting one of the four preset roles along the top:
- Administration: Access to everything
- Scorecard Builder: Access to everything except admin-level settings
- Data Entry: Ability to add comments, enter data, and action management
- Presenter: Add comments and action management
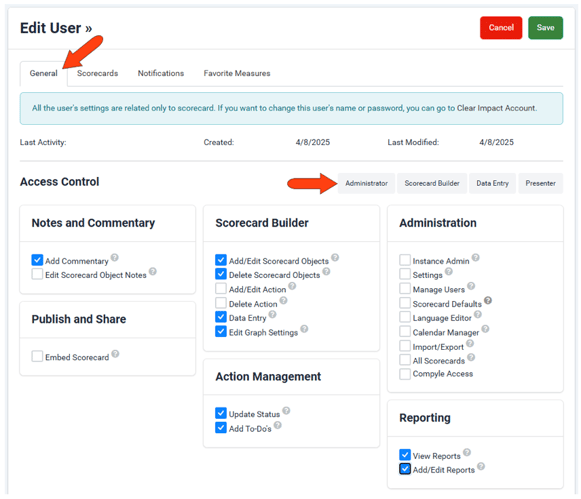
Then fine-tune the user’s permissions by enabling or disabling Access Control options.
- Add Commentary: Can comment on scorecard objects.
- Edit Scorecard Object Notes: Can edit all the notes of scorecards they have access to.
- Embed Scorecard: Can view and use the embed code for scorecard objects they have access to. (If Add/Edit Scorecard Objects is also enabled, they can toggle the embed feature for scorecards.)
- Add/Edit Scorecard Objects: Can edit and create new scorecard objects.
- Delete Scorecard Objects: Can delete any scorecard objects they have access to.
- Add/Edit Action: Can edit and create new actions.
- Delete Actions: Can delete any actions that they have access to.
- Data Entry: Can add data values to measures, but cannot change measure details.
- Edit Graph Settings: Can access a measure’s data graph to change settings.
- Update Status: Can add and edit action statuses in the Action Manager, or for actions in measures to which they have access
- Add To-Do's: Can add and edit to-do's for actions in the Action Manager , or for actions in measures to which they have access.
- Instance Admin: Can access and make changes to high-security sections of your instance. These include API XREF, Billing, Partner Connect, and, if you have multiple instances, all the Multi-Site Tools.
- Settings: Can access the General Settings admin page.
- Manage Users: Can access the Users admin page, for adding and editing users.
- Scorecard Defaults: Can access the admin pages for Notes, Action Custom Fields, and Global Color Bands.
- Language Editor: Can access the Common Terms admin page.
- Calendar Manager: Can access the Reporting Frequencies admin page.
- Import/Export: Can access the Import Users admin page.
- All Scorecards: Can view every scorecard and scorecard object in the instance, regardless of other settings. Users without this permission will only be able to see scorecard objects that are linked to scorecards they have access to. If a scorecard object is not linked to a scorecard then only users with this permission will be able to see it. A user without this permission will need to have scorecards assigned to them on the Scorecards tab of this page.
- Compyle Access: Can switch to Compyle via the option on the top menu.
- View Reports: Can access Reports, to view reports and adjust report filters.
- Add/Edit Report: Can access Reports to view, add, edit, and delete reports.
Note: Assign reports permissions carefully, as reports may contain data the user would not otherwise be able to see depending on scorecard access.
In the Scorecards tab, select the scorecards this user will be able to access. If none are specified, the user can access all scorecards as long as they have Add/Edit Scorecard permission.
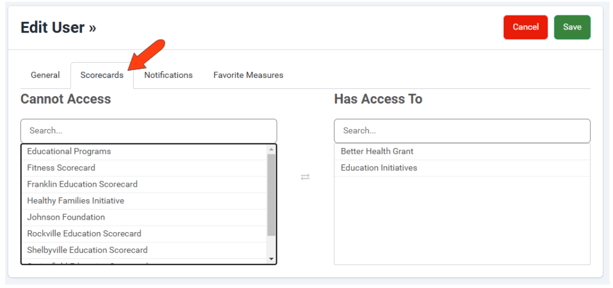
Note: You can also set user access when creating a scorecard.
In the Notifications tab, choose the types of notifications the user will receive: weekly or monthly digests of actions and favorite measures, and / or action notification emails.
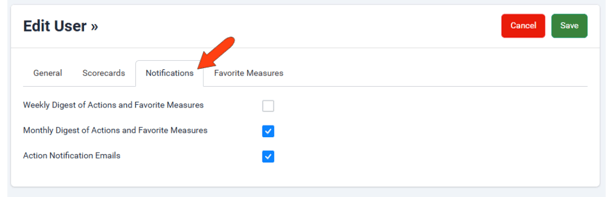
Note: Users can change their notifications settings in the Preferences.
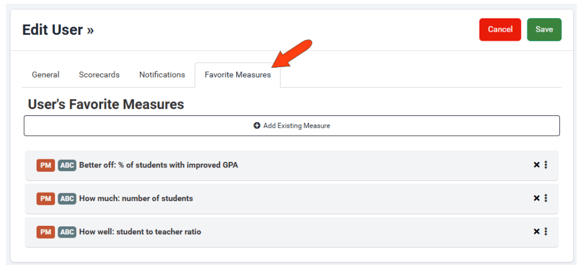
If the user will be accessing specific measures often, the Favorite Measures tab enables you to add those measures to the user’s Dashboard. Click Add Existing Measure, and use the search features to find measures to add.
Note: Users can also mark their own measures as favorites, when viewing a measure.
To return to the list of Scorecard users, click Users in the Admin menu along the left, or click the Admin icon and choose Users.
Enabling Hide Inactive Users displays only active users. Each user has a drop-down arrow next to their Edit button. Clicking this arrow enables you to deactivate an active user, or reactivate an inactive user.
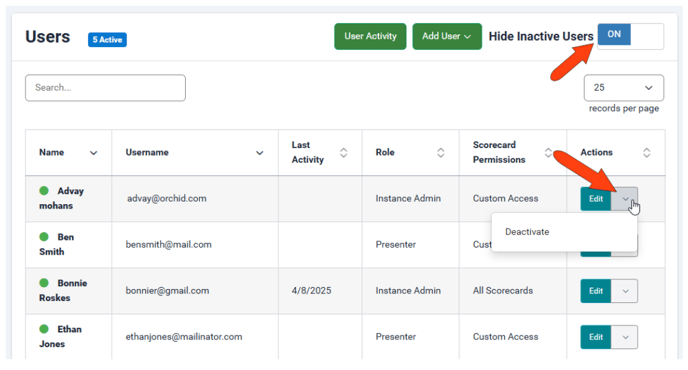
If Hide Inactive Users is disabled, both active and inactive users are listed in the Users table. For active users, clicking the Edit button enables you to change user permissions and other properties. Inactive users cannot be edited.